 Online Contact
 Send Message
Flat Die Feed Pellet Machine Operating Instructions
File Download
Get the full operation manual in PDF format.
- 2.1 Lubrication Before Start-up
- 2.2 Adjusting the Roller and Die Gap
- 2.3 Running-in a New Die Plate
- 2.4 Checking the Die Rotation Direction
- 2.5 Machine Preheating
- 2.6 Shutdown Protection
- 2.7 Replacing the Die and Rollers
The flat die feed pellet machine is used to press powdered materials into solid feed pellets for livestock and poultry. It improves feed quality and storage, and the following guide explains basic operation, gap adjustment, and maintenance.
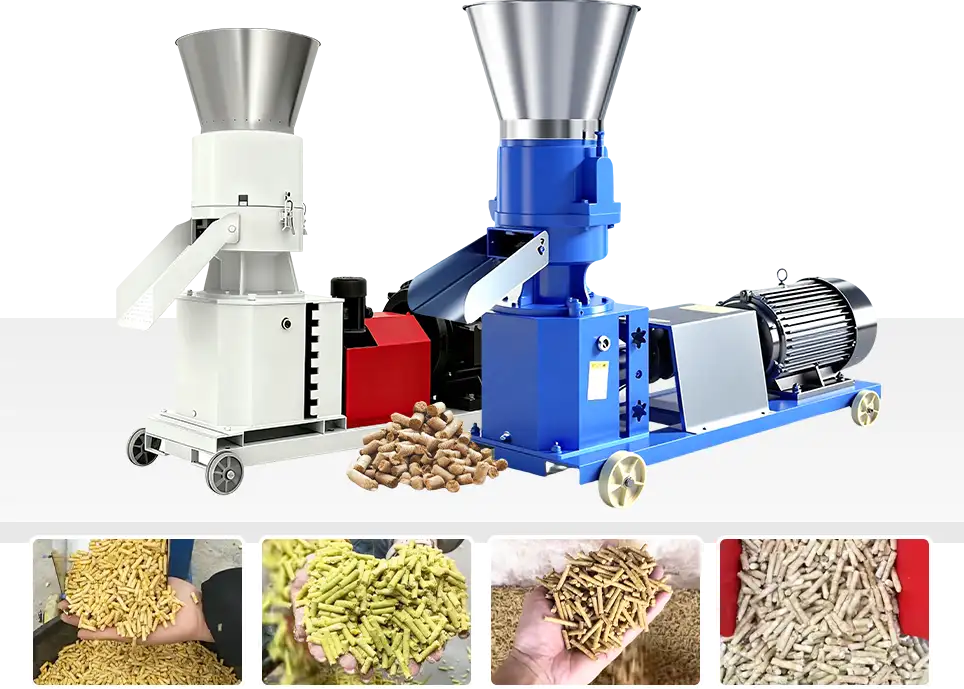
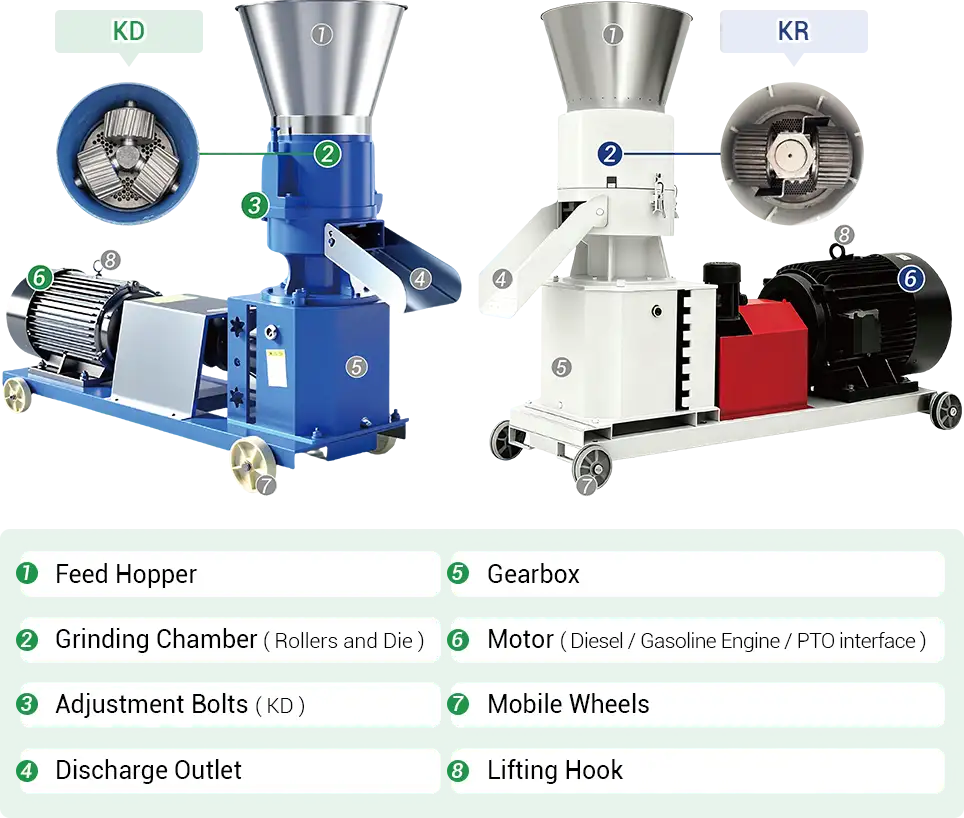
1. Product Overview
Application
This pellet machine is designed for making feed for various animals, including chickens, ducks, pigs, cattle, sheep, deer, horses, quails, pigeons, rabbits, fish, and shrimp.
Working Principle
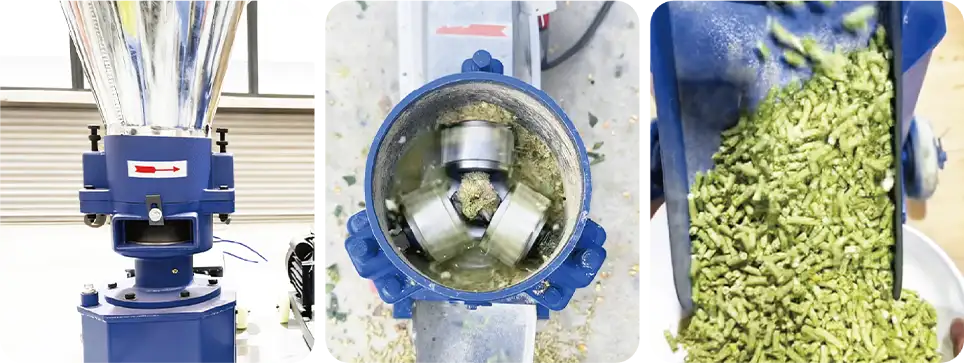
It presses powder feed into firm, uniform pellets through the pressure between rollers and the die. The high temperature during extrusion helps kill bacteria and improves feed taste and storage stability.
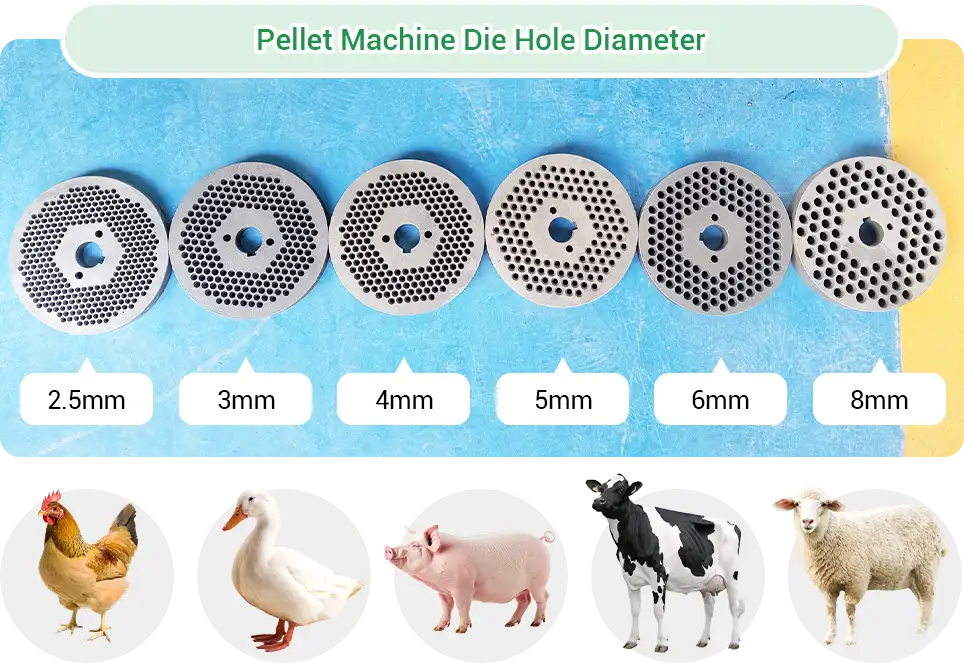
Die Options
Die hole sizes can be selected based on animal type and feed formula. The standard die is 4 mm, and optional sizes from 2.5 mm to 8 mm are available to meet different production needs.
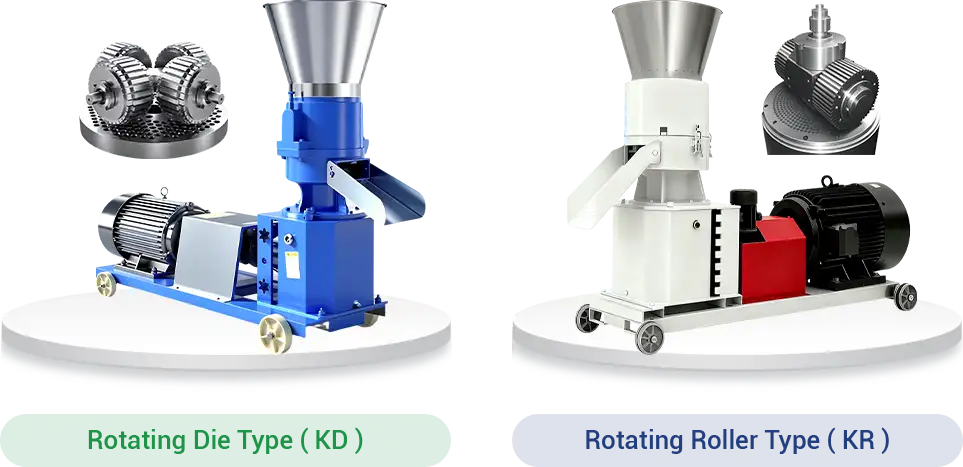
1.1 Machine Classification
According to different standards, the machine can be classified as follows:
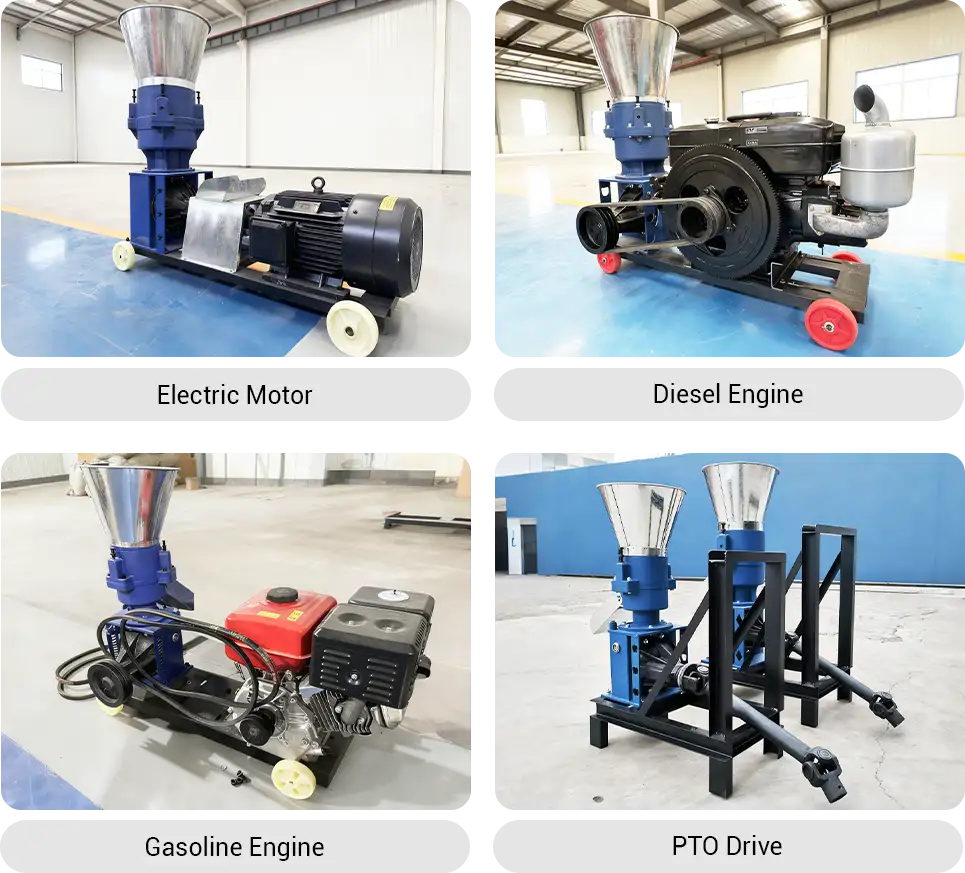
By structure: rotating die type and rotating roller type.
By power source: electric motor, diesel engine, gasoline engine, or PTO drive.
1.2 Machine Structure
1.3 Safety Warnings
- Add lubricating oil before use; the machine is shipped dry.
- Do not touch moving parts during operation.
- Always cut off power or stop the engine before service or cleaning.
- Keep metal, stones, and other hard objects out of the feed.
- Ensure the motor meets rated power before running.
2. Operation and Use
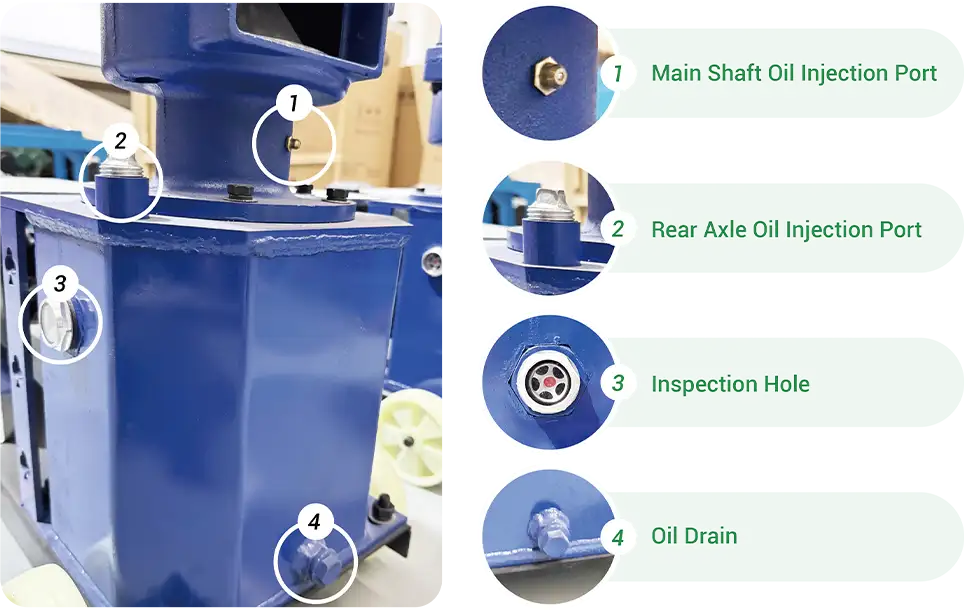
2.1 Lubrication Before Start-up
Bearing Lubrication
Use a grease gun to slowly inject lithium grease through the nipple.
Stop when pressure rises or new grease appears at the seal.
Gearbox Lubrication
Before first start, add hypoid gear oil through the gearbox oil port.
The recommended oil volume varies by model and gearbox type, as shown below.
Table 1 Gearbox– Rotating Die Type(KD Series)
| Model | Oil Volume (L) |
| 125 | 4.5 L |
| 150 | 4.5 L |
| 160 | 4.5 L |
| 210 | 10 L |
| 230 | 10 L |
| 260 | 20 L |
| 300 | 25 L |
| 400 | 50 L |
| 500 | 70 L |
| 600 | 90 L |
Table 2 Gearbox – Rotating Roller Type(KR Series)
| Model | Oil Volume (L) |
| 190 | 5 L |
| 210 | 10 L |
| 260 | 20 L |
| 300 | 40 L |
| 400 | 75 L |
| 500 | 110 L |
For gearboxes with an oil sight window, fill oil to half of the window height, at the red mark in the middle. Insufficient oil may cause gear wear and overheating, while excessive oil may result in leakage or foaming.
Precautions
- Perform oil filling or draining only when the machine is stopped to avoid burns or damage.
- Use the specified type of gear oil; do not mix with other oils.
- Clean the oil port before filling to prevent impurities from entering the gearbox.
2.2 Adjusting the Roller and Die Gap
The machine is preset before delivery, but the gap between rollers and die may need readjustment after long transport or when the die is replaced.
2.2.1 Adjusting Rotating Die Type (KD Series)
1. Turn off the machine and ensure it's fully powered off.
2. Locate the roller adjustment bolts and adjust the gap to 0.1–0.3 mm.
3. After adjustment, re-tighten the locking nuts.
Gap Checking
Use a feeler gauge to check the roller–die gap (See fig. 2, section 2.2.2.), or insert an A4 paper and rotate the die manually. If the paper is jammed, torn, or leaves no mark, the gap is incorrect and must be readjusted.
Smooth idle operation without noise or vibration indicates proper clearance.
2.2.2 Adjusting Rotating Roller Type (KR Series)
1. Turn off and disconnect the power.
2. Secure the die to prevent movement.
3. Loosen the locking nut above the pressure roller and adjust:
Turn clockwise to tighten (reduce the gap).
Turn counterclockwise to loosen (increase the gap).
Recommended gap: 0.1–0.3 mm.
4. After adjustment, re-tighten the locking nut.

Gap Checking
Use a feeler gauge to check the gap. Alternatively, rotate the pressure roller: if you feel even friction and no jamming, the gap is correctly set.
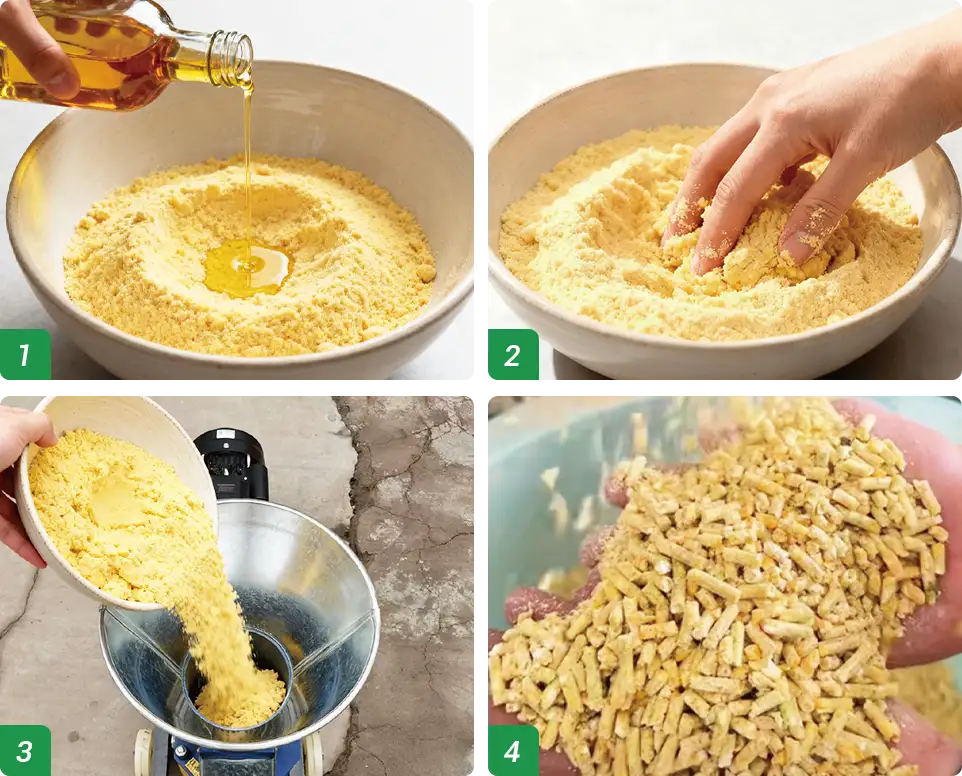
2.3 Running-in a New Die Plate
Before normal use, the new die should be run in.
Mix corn flour with cooking oil at a 10:1 ratio to make the conditioning material. Feed it slowly into the inlet and let the machine run at low speed for about 10–30 minutes.
This process smooths the inner wall of the die holes, reducing blockage and wear, and improving pellet discharge.
2.4 Checking the Die Rotation Direction
Before starting, confirm that the die rotates in the correct direction.
After startup, the die should rotate as indicated by the arrow on the machine body (usually counterclockwise when viewed from the discharge side). In normal operation, pellets should discharge slightly to the right.
If the rotation is incorrect, stop the machine immediately and correct it by adjusting the motor wiring sequence or power output direction to prevent blockage, die damage, or abnormal wear.
2.5 Machine Preheating
Before pelletizing, preheat the machine, especially diesel or gasoline types. This warms the die and rollers, reduces resistance, and stabilizes discharge.
Feed a small amount of conditioning material once the machine runs normally. When steam appears above the hopper, the machine is ready.
Preheat for about 5 minutes. If pellets form evenly and flow well, start normal production.
Precautions
- Do not run empty or without oil.
- In cold weather, extend preheating time.
- Feed materials promptly after preheating to avoid clogging.
2.6 Shutdown Protection
Before stopping the machine, run a short pre-shutdown cycle to prevent material in the die holes from solidifying, clogging, or rusting. This also reduces friction at the next start.
Steps
- Stop feeding and let remaining material discharge.
- Add a mix of corn flour and cooking oil (10:1) through the feed inlet.
- Run the machine at low load for 1–2 minutes to coat the die holes with oil.
- Turn off the power or stop the engine.
2.7 Replacing the Die and Rollers
Most dies can be used on both sides.
The die and rollers are wearing parts with a service life of about 300–500 hours.
Check their condition every month. If heavy wear is found, replace them as a matched set.
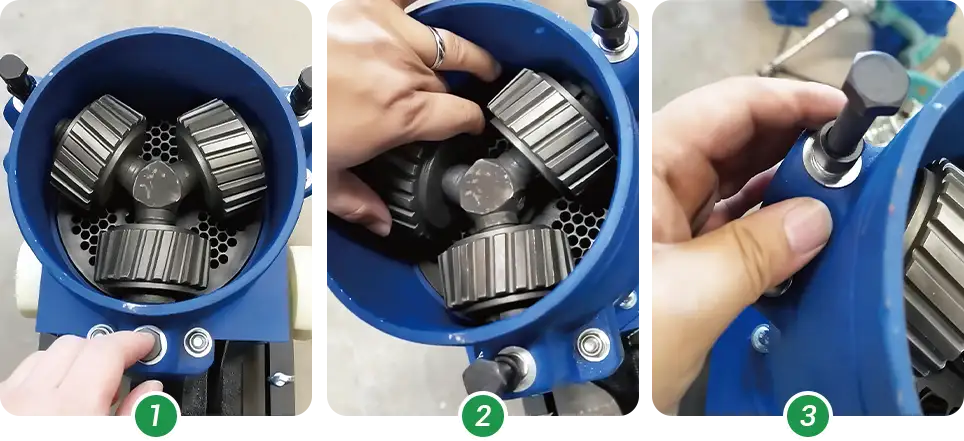
2.7.1 Rotating Die Type (KD Series)
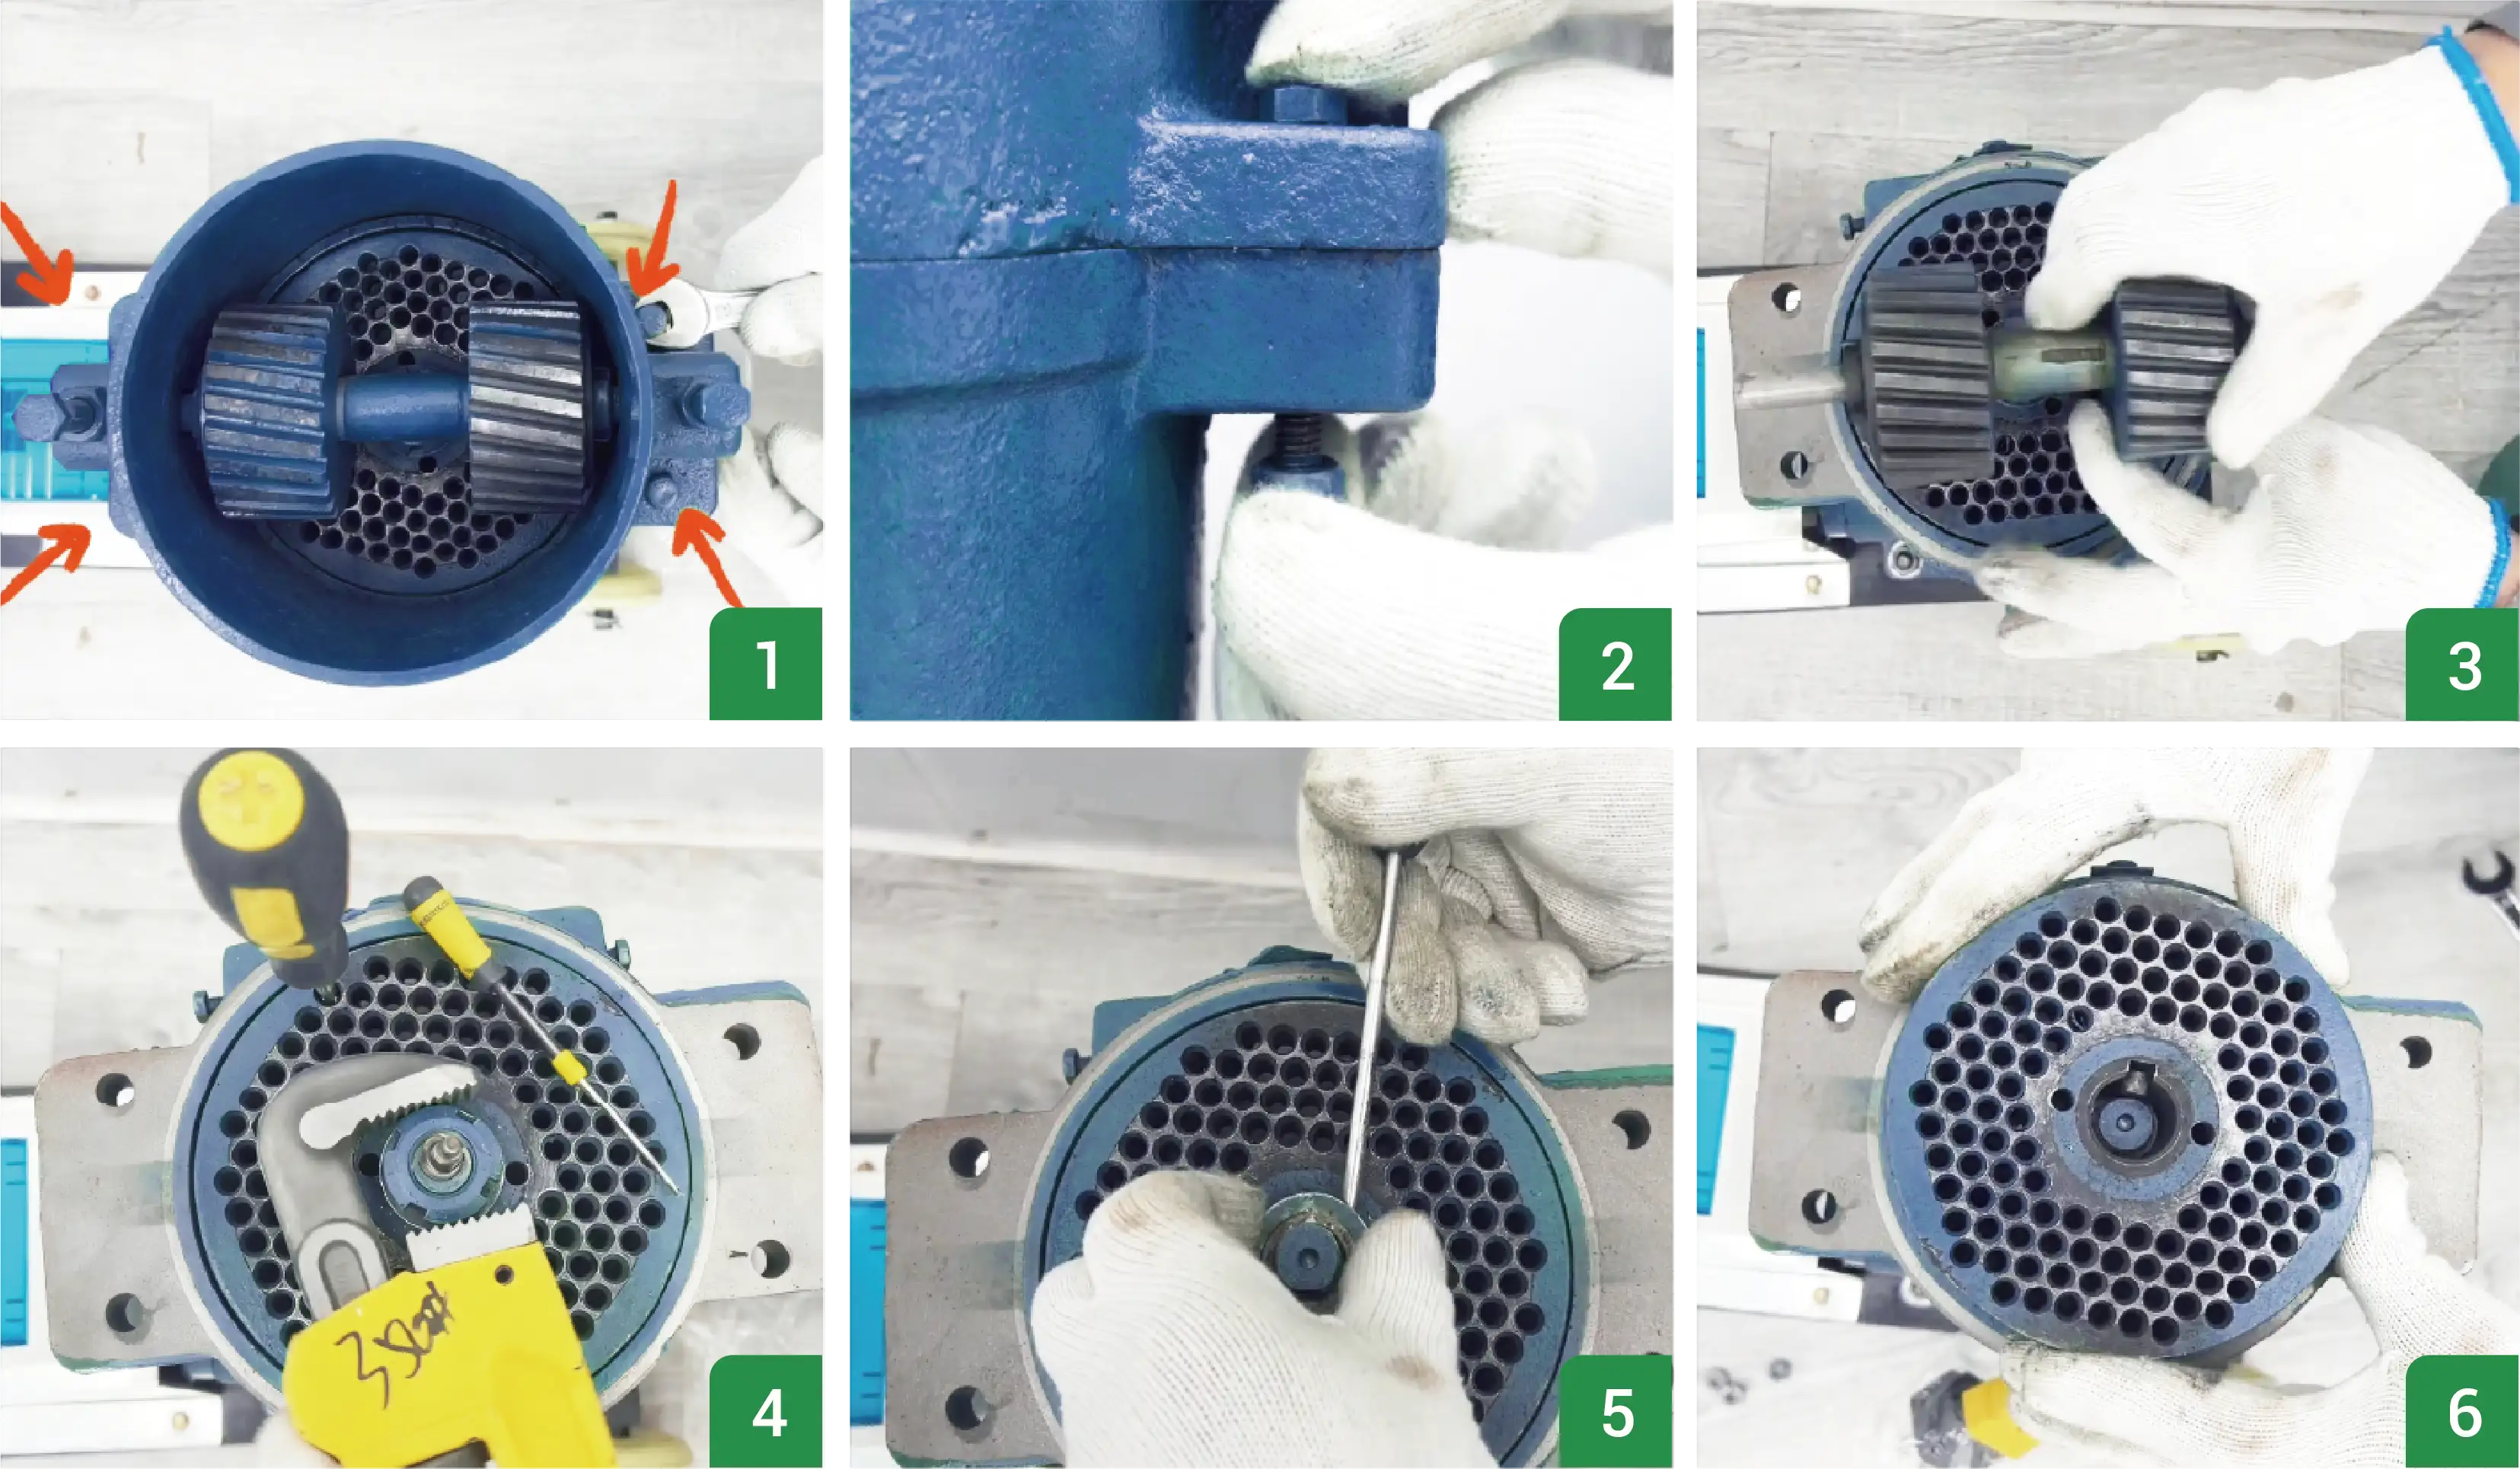
- Turn off the power or engine and wait until the machine stops completely.
- Open the top cover and clean residual material around the die, rollers, and outlet.
- Loosen the roller adjustment bolts and lock nuts, lift out the rollers, and remove the die fixing bolts. Tap or pull the die out evenly if tight.
- Align the new die with the shaft pins, place it flat, and secure it. Install the new rollers. Use the spacer ring for small-hole dies if needed.
- Adjust the roller–die gap using the bolts (see Section 2.2) and ensure the rollers rotate smoothly by hand.
- Tighten the lock nuts, reinstall the hopper, and run the machine empty for 1–2 minutes before testing with feed material.
Video Demo (Rotating Die Type)
2.7.2 Rotating Roller Type (KR Series)
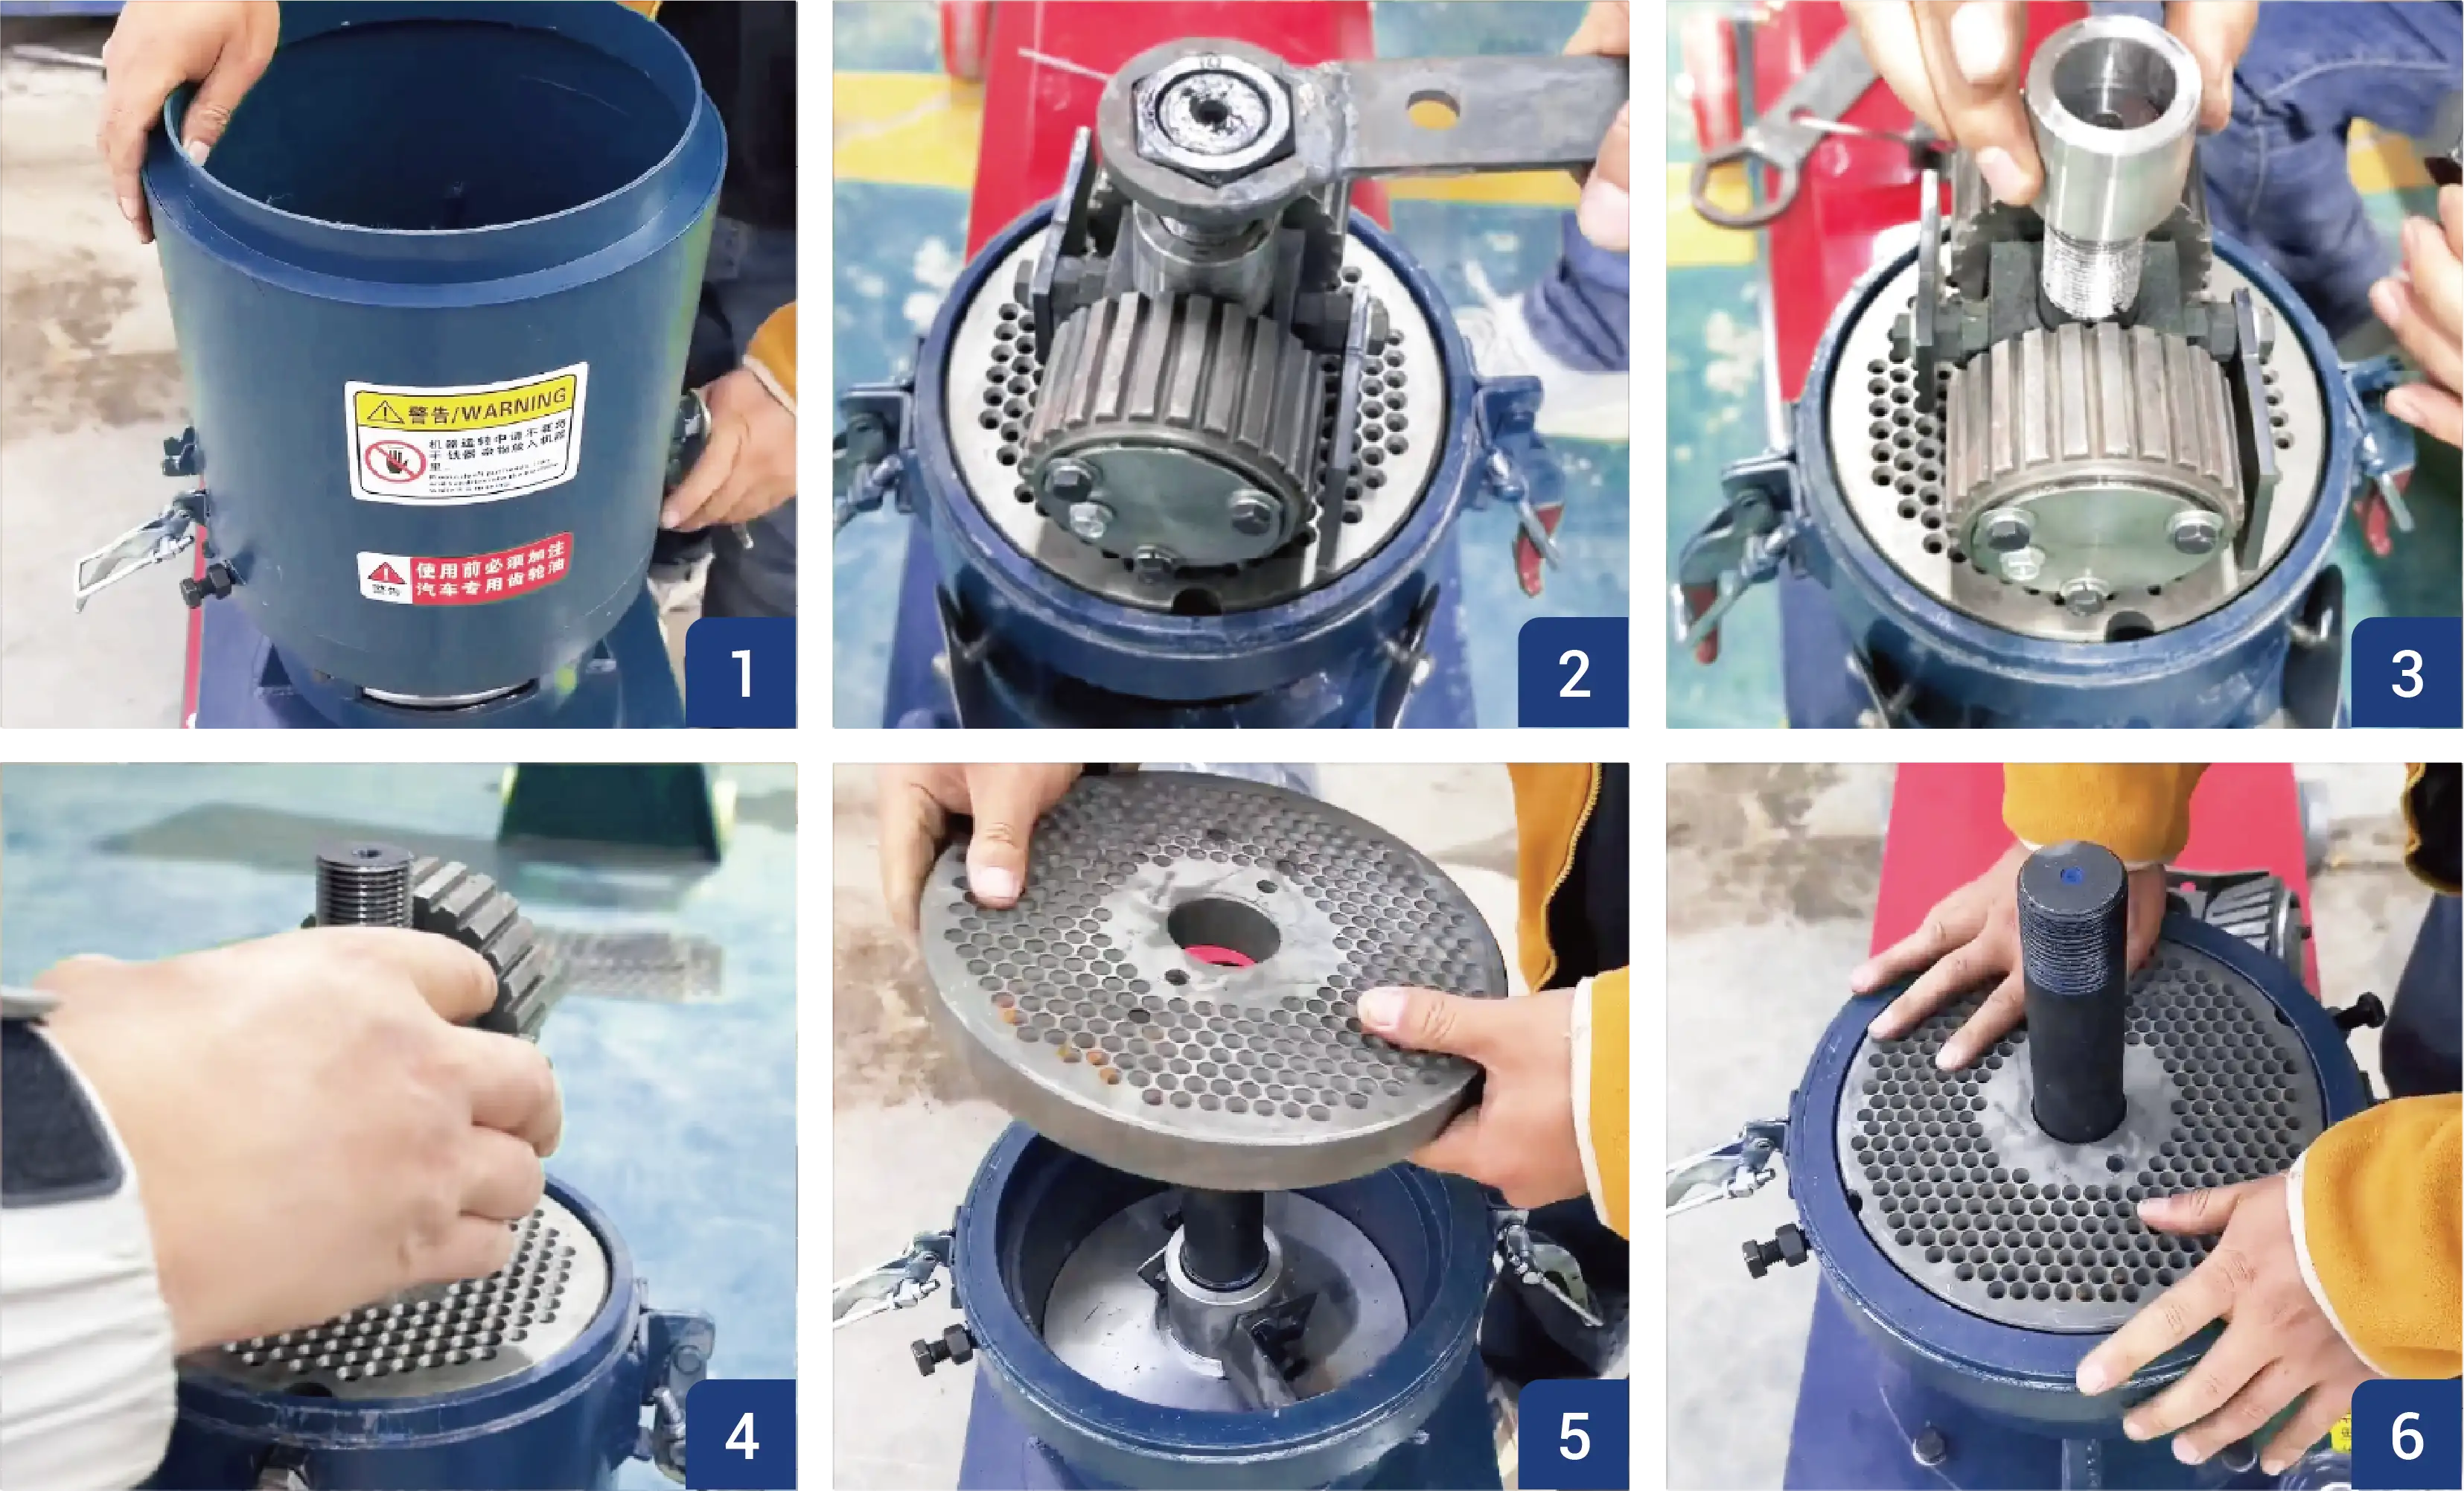
- Ensure the machine is completely stopped and power is disconnected.
- Remove the feed hopper and safety cover. Loosen the main shaft bolt and take out the roller assembly.
- Unscrew the die bolts and tap around the die edge with a copper rod to release it, then remove the die.
- Place the new die flat into the bearing center and secure it tightly with side bolts.
- Install the new rollers with spacers and bolts, tightening them evenly with a wrench.
- Adjust the roller–die gap evenly on both sides (see Section 2.2), reinstall the cover, and test the machine for smooth operation.
Video Demo (Rotating Roller Type)
3. Common Problems and Solutions
Poor or No Pellet Discharge
| Possible Cause | Solution |
| Die not properly run-in / Hole surface rough | Run in with oily material (see 2.3) |
| Die holes blocked | Stop the machine and clean holes with a wire or compressed air |
| Roller–die gap too wide | Readjust the gap (see 2.2) |
| Material too dry or poor flow | Adjust moisture to 12–16% and mix evenly |
| Machine not preheated | Run empty for 3–5 minutes before feeding (see 2.5) |
Soft Pellets or Excessive Powder
| Possible Cause | Solution |
| Moisture too high (soft pellets) | Reduce to 12–16% or add dry mix |
| Low roller pressure (soft pellets) | Tighten roller bolts to increase pressure |
| Poor binding formula (more powder) | Add oil or binder |
| Weak motor or unstable speed (more powder) | Check motor and load to meet specifications |
| Worn or large die holes (poor forming) | Inspect the die and replace if needed |
Rough Pellet Surface
| Possible Cause | Solution |
| Die holes not smooth or worn | Polish or replace the die |
| Feed too dry or uneven | Adjust moisture and mix evenly |
| Roller pressure unstable | Check and tighten roller bolts |
| Insufficient lubrication | Add a small amount of oil to the feed |
Motor Stops or Overload Trips
| Cause | Solution |
| Too much feed or blockage | Stop and clear the hopper and die, then reduce feed |
| Roller–die gap too small | Adjust the gap (see 2.2) |
| Die holes blocked | Clean the die before restarting |
| Foreign objects inside | Remove objects and check to prevent reentry |
| Motor or wiring fault | Check wiring, current, and overload device |
| Die installed backward | Reinstall and adjust the die direction correctly (see 2.4). |
Models with 22 kW or larger motors are equipped with a soft-start cabinet to reduce starting current and protect the motor and drive system.
Pellet Machine Overheating
| Cause | Solution |
| Long continuous operation | Stop to cool and reduce load |
| Insufficient lubrication | Add grease or clean bearings |
| Blocked die holes | Stop and clean the die |
| Poor ventilation | Check cover and improve airflow |
For long-term operation, install an oil pump and air-cooling unit to improve cooling, reduce temperature rise, and keep the machine running stably.
Power Specifications by Model
Rotating Die Type (KD Series)
| Model | Motor Power (kW) | Diesel Engine (HP) | Gasoline Engine (HP) |
| KD-125 | 4.5 | 6 | 170F (7.5 HP) |
| KD-150 | 4.5 | 6 | 190F (13 HP) |
| KD-160 | 5.5 | 8 | 190F (13 HP) |
| KD-180 | 5.5 | 8 | 192F (15 HP) |
| KD-210 | 7.5 | 15 | - |
| KD-230 | 11 | 18 | - |
| KD-260 | 15 | 22 | - |
| KD-300 | 22 | 35 | - |
| KD-400 | 37 | 85 | - |

All electric models use 4-pole pure copper motors built to national standards.
Voltage and frequency can be customized as required, and units can be refitted with diesel or gasoline engines if needed.
Rotating Roller Type (KD Series)
| Model | Power (kw) |
| KR-190 | 5.5 |
| KR-190P | 7.5 |
| KR-210 | 11 |
| KR-260 | 18.5 |
| KR-300 | 30 |
| KR-400 | 45 |
| KR-500 | 75 |
All rotating roller models are equipped with 6-pole motors, 380V 50Hz three phase, voltage customizable, equipped with a high torque six pole motor, running speed 960 rpm.
Need Some Help?
Contact us quickly and we will reply you within 24 hours. We will not disclose your information.